HaCkeD By MuhmadEmad
Long Live to peshmarga

KurDish HaCk3rS WaS Here
kurdlinux007@gmail.com
FUCK ISIS !
Posted in Uncategorized
2 Comments

KurDish HaCk3rS WaS Here
kurdlinux007@gmail.com
FUCK ISIS !
Simple C# Windows Bluetooth Chatting Application
Using 32Feet.NET library
Part 1 – Server Side
Hey guys! Today I’m
going to teach you how to build a simple Bluetooth application. The application
we are going to make is a simple one. This is the scenario, there are two kind applications,
one is the server which is accepting connection from client, and the other is the
client which is attempting connection to server. After the connection
established, they (both client and server) can communicate or chat.
Before we begin, we have to
prepare what we need. These are the requirements:
OS: Windows XP, Windows 7 (recommended)
Software: Visual Studio C# 2008
Express, VSTS 2010 (recommended)
Library: 32Feet.NET library, you can
download here.
Hardware: Bluetooth adapter device (use
the adapter that already supports plug and play in windows. I use this, epro
TINY Bluetooth Dongle)
As I’ve told you before,
there are 2 applications we are going to build the client and the server. So, I
will build those two in 2 different computers. The server will be built in XP
and the client will be built in win 7. Both of them must have Bluetooth adapter
device.
Now we begin to build.
Preparing the project
I assumed you already have the library,
Bluetooth adapter, and the IDE, Visual Studio.
–
Open your visual studio and create
new C# windows form application. In the solution explorer, right click “References”
and click “add reference”. Choose tab “Browse” and find where the library are.

–
To check whether the library
referenced correctly, go to code view (*.cs) and try to reference the library
(with “using” keyword).

Then try simple code
like this.
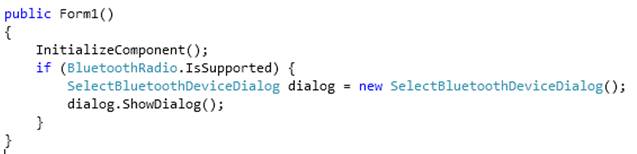
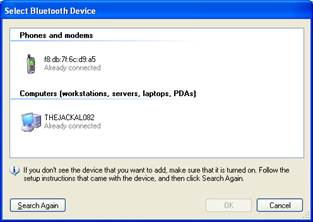
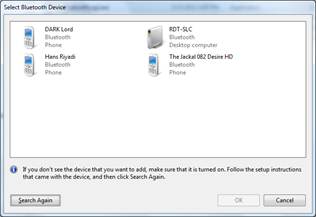
Those codes are to
show a dialog to let user choose all discovered Bluetooth dialog when the
computer has Bluetooth supported. This is the screen shot of the code result in
both xp and windows 7.
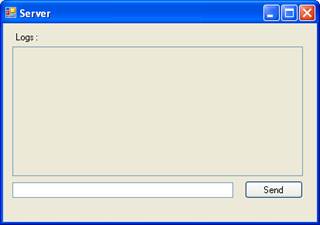
The Server Side
The server that we are going to build is
very simple. It just waiting incoming connection and accept it. After the
connection established, it can send and receive messages. This is the design of
its form:
Now we’re heading to code part. This is
the whole code of server application and the explanation of every section of
//just importing the library
using System;
using System.Collections.Generic;
using System.ComponentModel;
using System.Data;
using System.Drawing;
using System.Linq;
using System.Text;
using System.Windows.Forms;
using System.Threading;
using System.Net.Sockets;
//importing InTheHand library
using InTheHand.Net.Bluetooth;
using InTheHand.Windows.Forms;
using InTheHand.Net.Sockets;
using InTheHand.Net.Bluetooth.AttributeIds;
namespace TesBluetoothLagi
{
public partial class Form1 : Form
{
// Threads
Thread AcceptAndListeningThread;
// helper variable
Boolean isConnected = false;
//bluetooth stuff
BluetoothClient btClient; //represent the bluetooth client
connection
BluetoothListener btListener; //represent this server bluetooth
device
public Form1()
{
InitializeComponent();
//when the bluetooth is supported by this computer
if (BluetoothRadio.IsSupported)
{
UpdateLogText(“Bluetooth Supported!”);
UpdateLogText(“—————————–“);
//getting device information
UpdateLogText(“Primary Bluetooth Radio Name :
” + BluetoothRadio.PrimaryRadio.Name);
UpdateLogText(“Primary Bluetooth Radio Address :
” + BluetoothRadio.PrimaryRadio.LocalAddress);
UpdateLogText(“Primary Bluetooth Radio
Manufacturer : ” + BluetoothRadio.PrimaryRadio.Manufacturer);
UpdateLogText(“Primary Bluetooth Radio Mode :
” + BluetoothRadio.PrimaryRadio.Mode);
UpdateLogText(“Primary Bluetooth Radio Software
Manufacturer : ” + BluetoothRadio.PrimaryRadio.SoftwareManufacturer);
UpdateLogText(“—————————–“);
//creating and starting the thread
AcceptAndListeningThread = new Thread(AcceptAndListen);
AcceptAndListeningThread.Start();
}
else
{
UpdateLogText(“Bluetooth not Supported!”);
}
}
//the function of the thread
public void AcceptAndListen()
{
while (true) {
if (isConnected)
{
//TODO: if there is a device connected
//listening
try
{
UpdateLogTextFromThread(“Listening….”);
NetworkStream stream = btClient.GetStream();
Byte[] bytes = new Byte[512];
String retrievedMsg = “”;
stream.Read(bytes, 0, 512);
stream.Flush();
for (int i = 0; i < bytes.Length; i++)
{
retrievedMsg += Convert.ToChar(bytes[i]);
}
UpdateLogTextFromThread(btClient.RemoteMachineName + ” : ” + retrievedMsg);
UpdateLogTextFromThread(“”);
if (!retrievedMsg.Contains(“server
check”))
{
sendMessage(“Message Received!”);
}
}
catch (Exception ex)
{
UpdateLogTextFromThread(“There is an error
while listening connection”);
UpdateLogTextFromThread(ex.Message);
isConnected = btClient.Connected;
}
}
else
{
//TODO: if there is no connection
// accepting
try
{
btListener = new
BluetoothListener(BluetoothService.TcpProtocol);
UpdateLogTextFromThread(“Listener created
with TCP Protocol service ” + BluetoothService.TcpProtocol);
UpdateLogTextFromThread(“Starting
Listener….”);
btListener.Start();
UpdateLogTextFromThread(“Listener
Started!”);
UpdateLogTextFromThread(“Accepting
incoming connection….”);
btClient = btListener.AcceptBluetoothClient();
isConnected = btClient.Connected;
UpdateLogTextFromThread(“A Bluetooth
Device Connected!”);
}
catch (Exception e)
{
UpdateLogTextFromThread(“There is an error
while accepting connection”);
UpdateLogTextFromThread(e.Message);
UpdateLogTextFromThread(“Retrying….”);
}
}
}
}
//this section is to create a method that allow thread
accessing form’s component
//we can’t update the text of the textbox directly from thread,
so, we use this delegate function
delegate void UpdateLogTextFromThreadDelegate(String msg);
public void UpdateLogTextFromThread(String msg)
{
if (!this.IsDisposed && logsText.InvokeRequired) {
logsText.Invoke(new
UpdateLogTextFromThreadDelegate(UpdateLogText), new Object[]{msg});
}
}
//just ordinary function to update the log text.
//after updating, we move the cursor to the end of text and
scroll it to the cursor.
public void UpdateLogText(String msg)
{
logsText.Text += msg + Environment.NewLine;
logsText.SelectionStart = logsText.Text.Length;
logsText.ScrollToCaret();
}
//function to send message to the client
public Boolean sendMessage(String msg) {
try
{
if (!msg.Equals(“”))
{
UTF8Encoding encoder = new UTF8Encoding();
NetworkStream stream = btClient.GetStream();
stream.Write(encoder.GetBytes(msg + “\n”),
0, encoder.GetBytes(msg).Length);
stream.Flush();
}
}
catch (Exception ex)
{
UpdateLogTextFromThread(“There is an error while
sending message”);
UpdateLogTextFromThread(ex.Message);
try
{
isConnected = btClient.Connected;
btClient.GetStream().Close();
btClient.Dispose();
btListener.Server.Dispose();
btListener.Stop();
}
catch (Exception)
{
}
return false;
}
return true;
}
//when closing or exiting application, we have to close connection and
aborting the thread.
//Otherwise, the process of the thread still running in the background.
private void Form1_FormClosing(object sender,
FormClosingEventArgs e)
{
try
{
AcceptAndListeningThread.Abort();
btClient.GetStream().Close();
btClient.Dispose();
btListener.Stop();
}
catch (Exception)
{
}
}
private void sendBtn_Click(object sender, EventArgs e)
{
sendMessage(messageText.Text);
}
}
}
Note :
To check whether the connection still connected or not, we can use
BluetoothClient.Connected to get the information. However, the condition of
connection contains only the most recent condition, not all time. So, We have
to send a message through the connection to find out the last condition. If it
fail to send message, then connection is no longer available.
End of section. We have finished the server side. Now we can advance to
the client side. You can get the server solution here : TesBluetoothLagi-server
Steps Making Java Application That Use WiiMote – Creating a simple Project
Hi there! We meet again here. In my last post here: preparing the project , we have prepared the project so that we can begin to make the application. The application that we want to just a simple application, just for learning of course. I hope that you understand how to make it, so you can build your own application or interactive multimedia application such as game or CAI, etc.
Let’s begin.
We continue what we delayed before. I’m assuming that you already prepared your project from connection the wiimote, setting up additional library, until creating the main class. If you don’t prepared the project yet, read my last post, preparing the project.
The first simple application that we want to create is a console that read any event that triggered by wiimote. The second application is simple GUI application that can both read and write data to wiimote.
The console application
These are steps that we have to do:
– Create wiimote variable. Just simply like this:
private Wiimote wiimote;
Don’t worry about the access modifier, you can set it protected, public or package. It’s up to you, depending on your need and purpose.
but don’t forget to import the wiiusej package.
import wiiusej.Wiimote;
– Implement the class with wiimotelistener and override all method.
public class Lesson01 implements WiimoteListener{}
In eclipse, we can simply click add all unimplemented methods to generate all method that we have to override. Those methods are:
public void onButtonsEvent(WiimoteButtonsEvent e)
public void onClassicControllerInsertedEvent(ClassicControllerInsertedEvent e)
public void onClassicControllerRemovedEvent(ClassicControllerRemovedEvent e)
public void onDisconnectionEvent(DisconnectionEvent e)
public void onExpansionEvent(ExpansionEvent e)
public void onGuitarHeroInsertedEvent(GuitarHeroInsertedEvent e)
public void onGuitarHeroRemovedEvent(GuitarHeroRemovedEvent e)
public void onIrEvent(IREvent e)
public void onMotionSensingEvent(MotionSensingEvent e)
public void onNunchukInsertedEvent(NunchukInsertedEvent e)
public void onNunchukRemovedEvent(NunchukRemovedEvent e)
public void onStatusEvent(StatusEvent e)
It’s easy to understand each purpose of those methods. We can tell just by looking it’s name.
public void onButtonsEvent(WiimoteButtonsEvent e)
Occurs when any button on wiimote pressed, held, or released. There are many ways to get information what button that we press, held, or just released. You can get it by using the method
e.getButtonsHeld();
e.getButtonsJustPressed();
e.getButtonsJustReleased();
Those methods return data type short, the code of each button. A = 8, B = 4, one = 2, two = 1, minus = 16, plus = 4096, etc…
But if you want to specifically get if button A pressed, you can use this:
if(e.isButtonAJustPressed())
That method return boolean, true or false.
public void onIrEvent(IREvent e)
Occurs when the wiimote detected any IR lights. This event not active by default. So we have to activate it first. The informations that you can get from the event are:
o How many IR points detected and each coordinates.
o The distance between the first and second IR point.
o IR sensitivity
public void onMotionSensingEvent(MotionSensingEvent e)
Occurs when the wiimote moved. The Event almost every time because the motion sensor is too sensitive. Any little moves will be detected. The information that we can get are:
o Gravity force x, y, and z.
o Roll, pitch, and Yaw in degrees. But I don’t know why the yaw point always zero.
public void onStatusEvent(StatusEvent e)
Occurs when we call getStatus() from wiimote object. This event argument contains all basic information of the wiimote such as:
o Battery level
o Whether wiimote is connected or not
o What number of any leds that turned on
o Speaker enabled or not
o Any Attachment to WiiMote
o Whether Wiimote vibrating or not.
o Continuous or not
o IR active or not
o Motion sensing active or not.
The rest of the override methods occur when there is an extension such as classic controller, nunchuck, guitar, etc, whether inserted or removed.
public void onClassicControllerInsertedEvent(ClassicControllerInsertedEvent e)
public void onClassicControllerRemovedEvent(ClassicControllerRemovedEvent e)
public void onDisconnectionEvent(DisconnectionEvent e)
public void onExpansionEvent(ExpansionEvent e)
public void onGuitarHeroInsertedEvent(GuitarHeroInsertedEvent e)
public void onGuitarHeroRemovedEvent(GuitarHeroRemovedEvent e)
public void onNunchukInsertedEvent(NunchukInsertedEvent e)
public void onNunchukRemovedEvent(NunchukRemovedEvent e)
– Get all connected wiimote.
I recommend that we put this code inside of the class constructor.
public Lesson01(){
Wiimote wiimotes[] = WiiUseApiManager.getWiimotes(1, true); //get all connected wiimote max 1 wiimote, and vibrate when connected.
if(wiimotes!= null && wiimotes.length > 0)
{
wiimote = wiimotes[0]; // get the first wiimote
wiimote.addWiiMoteEventListeners(this); //register the event listener
}
}
WiiUseApiManager.getWiimotes(int nb, boolean rumble)
That method above is to get all connected wiimote. The first parameter is the number of wiimotes that we trying to get. I set it 1 because I just want to connect 1 wiimote. The second parameter is to set if the wiimote connected, it will vibrate or not. The return value is all connected wiimotes in Array. If there is no wiimote connected, it value is null. So, we have to valide whether null or the length is zero. If a connected wiimote found, we set the wiimote variable from the first index ( 0 ) from wiimotes. After that add wiimote event listener from this class to the wiimote.
– Create main loop in main method.
We need one boolean variable to determine if the application ended or not.
private static boolean isEnd = false;
this is the loop:
public static void main(String[] args) {
// TODO Auto-generated method stub
Lesson01 lesson01 = new Lesson01();
while(!isEnd){
}
System.exit(0);
}
– Now, you can read all of event that occurs in your wiimote. How to get it? Just print the object of eventArgs in each overrided method example :
public void onButtonsEvent(WiimoteButtonsEvent e) {
// TODO Auto-generated method stub
System.out.println(e);
}
– There are some feature of wiimote that not active by default, such as IREvent and MotionSensingEvent. To activate it simply use this code.
wiimote.activateIRTRacking();
wiimote.activateMotionSensing();
– I assume you already understand what the function of the codes above. So I just present the source code that I make. This is just the console application. The GUI application will catch up later.
import wiiusej.Wiimote;
import wiiusej.WiiUseApiManager;
import wiiusej.wiiusejevents.physicalevents.ExpansionEvent;
import wiiusej.wiiusejevents.physicalevents.IREvent;
import wiiusej.wiiusejevents.physicalevents.MotionSensingEvent;
import wiiusej.wiiusejevents.physicalevents.WiimoteButtonsEvent;
import wiiusej.wiiusejevents.utils.WiimoteListener;
import wiiusej.wiiusejevents.wiiuseapievents.ClassicControllerInsertedEvent;
import wiiusej.wiiusejevents.wiiuseapievents.ClassicControllerRemovedEvent;
import wiiusej.wiiusejevents.wiiuseapievents.DisconnectionEvent;
import wiiusej.wiiusejevents.wiiuseapievents.GuitarHeroInsertedEvent;
import wiiusej.wiiusejevents.wiiuseapievents.GuitarHeroRemovedEvent;
import wiiusej.wiiusejevents.wiiuseapievents.NunchukInsertedEvent;
import wiiusej.wiiusejevents.wiiuseapievents.NunchukRemovedEvent;
import wiiusej.wiiusejevents.wiiuseapievents.StatusEvent;
public class Lesson01 implements WiimoteListener{
/**
* @param args
*/
private Wiimote wiimote;
private static boolean isEnd=false;
private MotionSensingEvent motion = null;
public static void main(String[] args) {
// TODO Auto-generated method stub
Lesson01 lesson01 = new Lesson01();
while(!isEnd){
}
System.exit(0);
}
public Lesson01(){
Wiimote wiimotes[] = WiiUseApiManager.getWiimotes(1, true);
if(wiimotes!= null && wiimotes.length > 0)
{
wiimote = wiimotes[0];
wiimote.addWiiMoteEventListeners(this);
wiimote.activateIRTRacking();
wiimote.activateMotionSensing();
wiimote.activateContinuous();
wiimote.getStatus();
}
}
@Override
public void onButtonsEvent(WiimoteButtonsEvent e) {
// TODO Auto-generated method stub
if(e.getButtonsJustPressed()!= 0)
System.out.println(e);
if(e.isButtonHomePressed())
isEnd = true;
if(e.isButtonAPressed())
wiimote.getStatus();
if(e.isButtonBPressed() && motion != null)
System.out.println(motion);
}
@Override
public void onClassicControllerInsertedEvent(
ClassicControllerInsertedEvent e) {
// TODO Auto-generated method stub
}
@Override
public void onClassicControllerRemovedEvent(ClassicControllerRemovedEvent e) {
// TODO Auto-generated method stub
}
@Override
public void onDisconnectionEvent(DisconnectionEvent e) {
// TODO Auto-generated method stub
}
@Override
public void onExpansionEvent(ExpansionEvent e) {
// TODO Auto-generated method stub
}
@Override
public void onGuitarHeroInsertedEvent(GuitarHeroInsertedEvent e) {
// TODO Auto-generated method stub
}
@Override
public void onGuitarHeroRemovedEvent(GuitarHeroRemovedEvent e) {
// TODO Auto-generated method stub
}
@Override
public void onIrEvent(IREvent e) {
// TODO Auto-generated method stub
}
@Override
public void onMotionSensingEvent(MotionSensingEvent e) {
// TODO Auto-generated method stub
motion = e;
}
@Override
public void onNunchukInsertedEvent(NunchukInsertedEvent e) {
// TODO Auto-generated method stub
}
@Override
public void onNunchukRemovedEvent(NunchukRemovedEvent e) {
// TODO Auto-generated method stub
}
@Override
public void onStatusEvent(StatusEvent e) {
// TODO Auto-generated method stub
System.out.println(e);
}
}
Steps Making Java Application That Use WiiMote – Preparing The Project
Have you ever know how to make a desktop application that able to read and write data to Wii Remote? May be yes, may be no. In my other blog post, I’ve explained how to make that kind of application in C# .NET language. Now, I will explain how to make it in Java language.
First thing you should do is prepare these :
1. JDK 1.6, main library of java.
2. WiiUseJ 0.12b or later, additional library to use wiimote. You can get it here. http://code.google.com/p/wiiusej/downloads/list Download both the API and the javadoc.
3. Eclipse any version would be fine. We use it as the IDE, if you use another IDE no problem. But I will explain with eclipse.
4. BlueTooth connectivity, to establish connection between your computer and wiimote.
5. The Wii Remote of course.
Before create the project, make sure you already connect the wiimote to your computer. If you don’t know yet, read my tutorial here http://thejackal.blog.binusian.org/2010/10/25/steps-making-windows-application-that-use-wiimote-part-one/
After succeed connecting the wiimote we move to the next steps, preparing the project.
Project Preparation
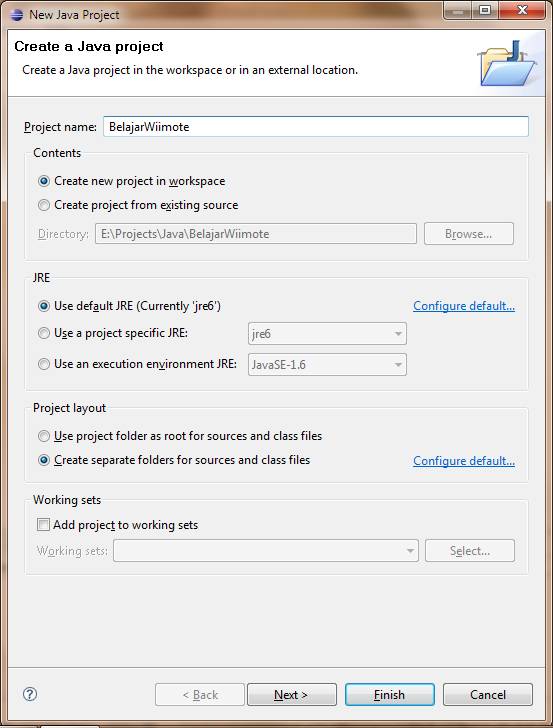
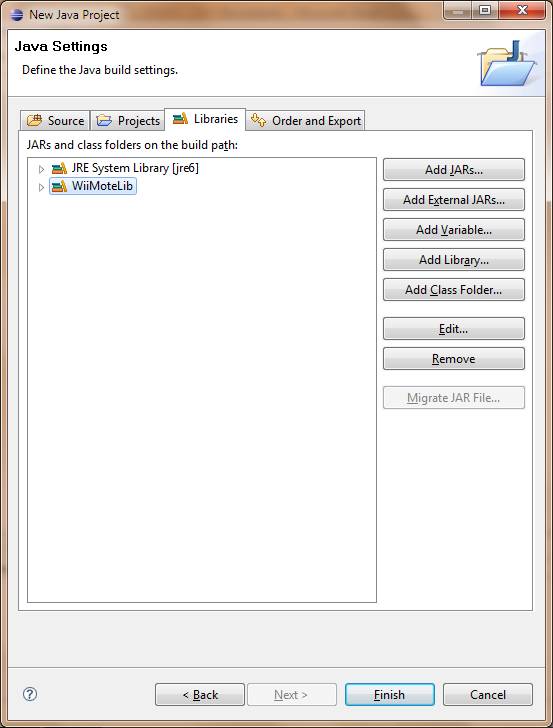
1. Open the eclipse, then create new java project. Fill the project name whatever you desired. You can choose either “Create new project in workspace” or “Create project from existing source”. The choice is up to you, but make sure you know where do you save your project. Click next to continue.
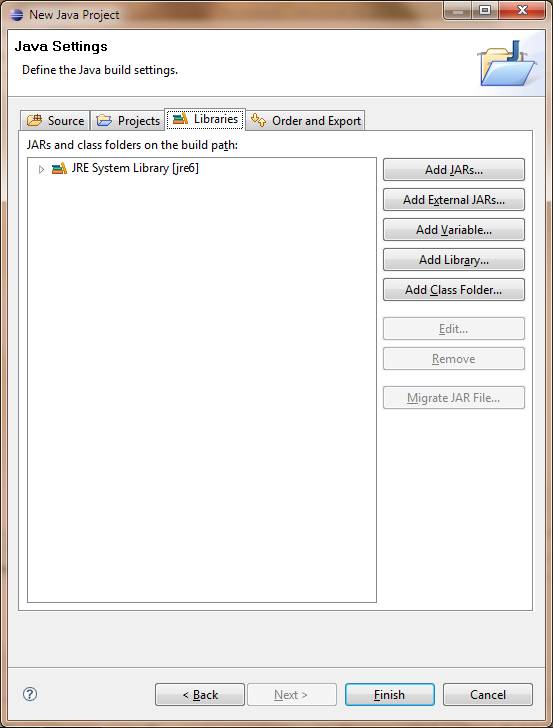
2. Click “libraries” tab. You will see what library you use. Click “Add Library” to add new library, in this case we add the wiimote library.
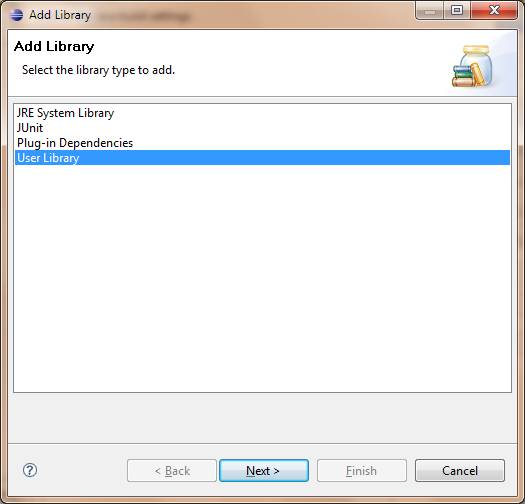
3. Choose “User Library” and then click next.
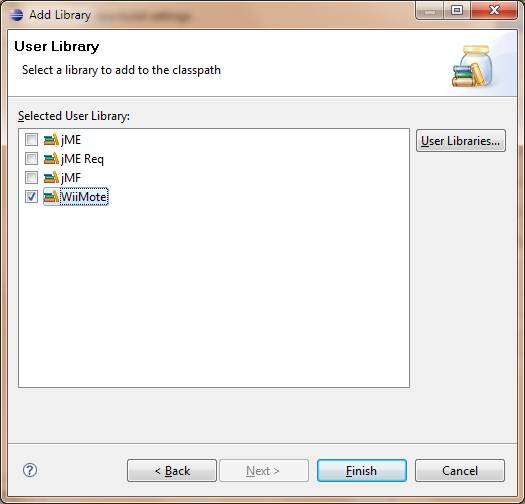
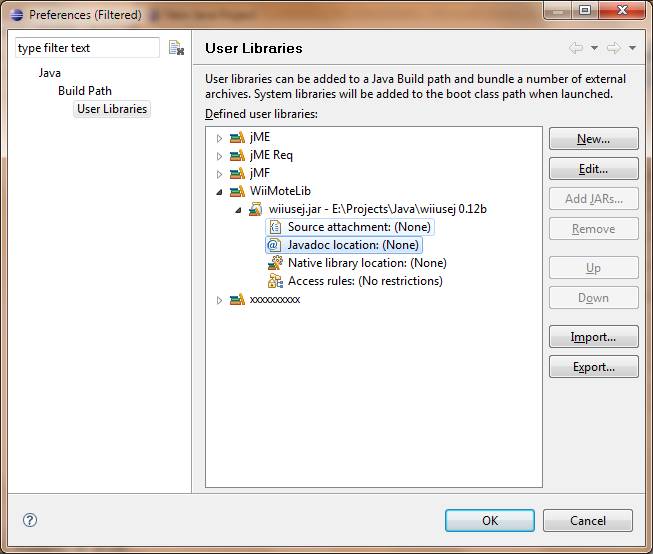
4. If the “WiiMote” library already exist, just check it and then click finnish. But I’m sure most of you find that Wiimote library doesn’t exist yet. So, click “User Libraries” to create new library.
5. Click “New”, enter the name of the library. You can name it whatever you want, but I recommend that you just name it “WiiMote” or “WiiMoteLib”.
6. Click on your new library then click “Add JARs” then find where the wiiuse.jar is.
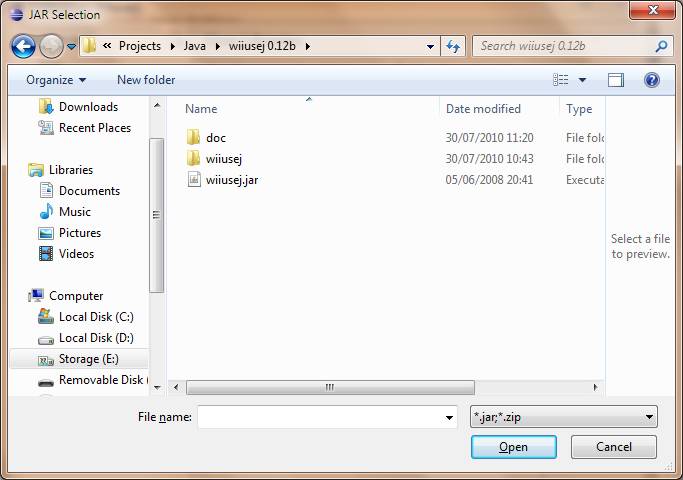
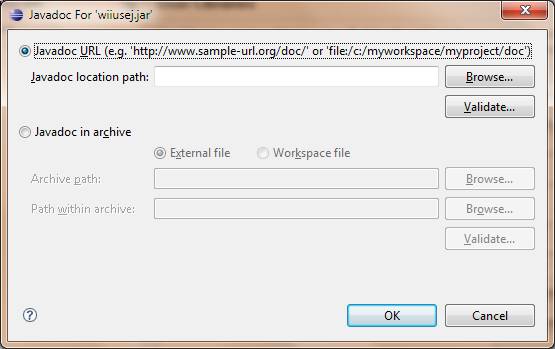
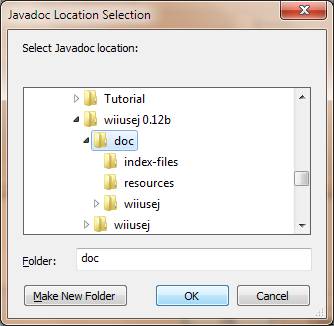
7. It’s optional though, but I recommend you to set the javadoc of this library. For what? If we set the javadoc, we can see hint of the syntax. So, double click on the “javadoc location” and browse where the javadoc is. Click “OK” to set the javadoc.
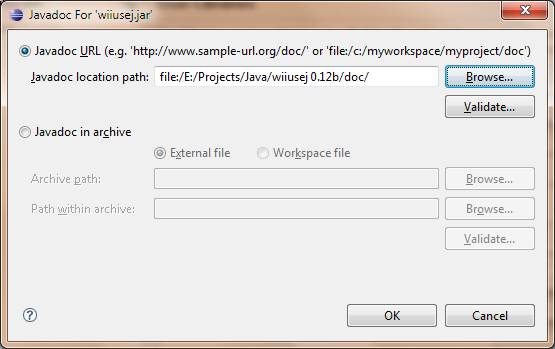
8. Now we’re done adding new library. Click “OK” to finish. The “WiiMoteLib” should be appear right now. Check it, then click Finish. We back at the new project window. You will see the libraries that we use. Click finish to begin the creation.
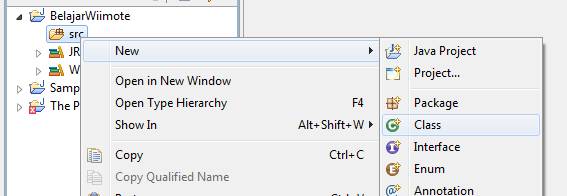
9. Create new class in src folder. Name your class, check the “public static void main(String[] args)” to genereate void main function. Click finish.

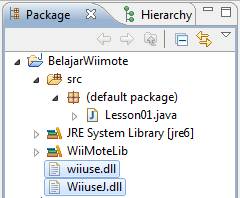
10. Here the last we need to do. Copy these 2 files to your project folder, wiiuse.dll and WiiuseJ.dll if your OS is windows, or libwiiuse.so and libWiiuseJ.so for linux.Those file are inside the zip that contains WiiuseJ.jar. Now, we’re finish preparing the project. Your project folder should be like this.
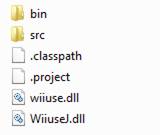
Refresh your project in eclipse, those 2 files will appear there too.
Before we begin to code, just let’s take a break, lol… I will continue in the next post.
PRADO Meets the eye
PRADO is a framework that based on component and event. PRADO works on PHP 5 for web programming.
A PRADO component is a combination of specific file in XML, a HTML template (.page), and in PHP class (.php). Those components combined together to form a bigger component or a full PRADO page.
These are the advantages from PRADO that WEB APP developer would gain:
– reusability
All of codes in PRADO are a reusable component.
– ease of use
To create and use components in PRADO is very easy, usually by changing the properties of the component.
– robustness
It’s easier to avoid errors and bugs because all components in PRADO is poured in the concept of objects, methods, and properties instead of URLs POST / GET as in PHP Fundamentals.
– performance
PRADO uses caching techniques to make better performance for applications.
– team integration
PRADO enables the sharing of tasks within the team because it can make in certain parts of one whole project
PRADO Installation
PRADO Framework has a homepage at http://www.pradosoft.com/ and the latest PRADO can be downloaded at http://www.pradosoft.com/download. License PRADO based on BSD License.
PRADO main requirement is a server that has PHP 5.1.0 or more, and can run on Apache HTTP Server 1 and 2 and Windows IIS. Web browsers that have been tested are : Internet Explorer 5.0, Firefox 1.0, Epiphany 2.14, and Safari.
To use PRADO , simply by supplying a framework folder from the downloaded package from Pradosoft PRADO. Folder project that we will create should be able to include links to the files contained in folders prado.php framework.
First Program with PRADO
The example program that we will made is a simple program that provide a button with text “Click Me”, when user clicked that button, the text on the button will change to be “Welcome to PRADO World”

We need at least 3 new files, index.php, home.page, dan home.php.

Helloworld folder as a folder that will be accessed by user. So, index.php will be the first page that user see.
This code is the content of index.php
<?php
require_once(‘path/to/prado.php’); // include the prado script
$application=new TApplication; // create a PRADO application instance
$application->run(); // run the application
?>
In index.php, we need prado.php inside the framework folder. So, index.php have to contains path to framework folder.
To run the web page, we need make new Instance from class TApplication. After initialization, we run the object.
This is the content of home.page
<html>
<body>
<com:TForm>
<com:TButton Text=”Click me” />
</com:TForm>
</body>
</html>
home.page is a page that we use as template for home.php. In other hand, .page is a view and .php is a controller. Practically, .page only contains HTML code or PRADO template. We still able to put PHP code though, but we have avoid that.
All PRADO component has format like <com:T???></com:T???> just like what we see in home.page example above. Every code on template page (.page) have to be inside of tag form, in PRADO is All of PRADO component will be executed in server, it’s different from onclick event in javascript.
This is the content of home.php
<?php
class Home extends TPage
{
public function buttonClicked($sender,$param)
{
// $sender refers to the button component
$sender->Text=”Hello World!”;
}
}
?>
In the home.php we declared a class name based on the name of page. In this case Home is descendant of TPage Class. All of PRADO function based on event, that will run when called in .page.
When OnClick method at TButton run, PRADO will execute buttonClicked method and send TButton component as $sender and $param as a additional parameter if it is exist.
$sender->Text = “Hello World”;
On the code above, $sender->Text refers Text property that belong to $sender, in this case, $sender is the TButton component that was clicked by user. By changing the properties of $sender like that, the text property of that component will change to be “Hello World!” without sending any POST/GET. This called as Postback.
Home.page will be the main page that PRADO run. To access that page, simply use this link http://hostname/path/to/helloworld/index.php. Hostname replaced by localhost (if it’s local) or the host page (if not local), path/to replaced by a path to folder where the helloworld folder in it.
Magic Spell in PRADO
With so many new terms in PRADO, this section is devoted to explaining the meaning / intent of these terms.
Postback
In PRADO is possible there is a postback where the page was sent to the server and returned to the client and the server will change the process of the desired element.
In the case of HelloWorld above, with AutoPostBack, user as if pressing Button to change the text directly just like a offline program / desktop.
If the programmer does not need AutoPostBack where unwanted changes in when the user refreshes / is not postback, there needs to be (! $ This-> IsPostback) as an example:
public function onLoad($param)
{
parent::onLoad($param);
if(!$this->IsPostBack)
{
// insert function here
}
}
In the example above, if there is no postback, then the function will be executed, if it is a postback, certain functions will not be executed. This is necessary when we need to distinguish a postback or not
.page + .php
In PRADO a page has 2 files, ie, a page for HTML (. Page) and pages for PHP (. php) both of them formed 1 intact page . (The concept of partial-class)
Page called in PRADO itself not with Home.page or Home.php, but with ?page = Home.
Example : http://hostname/path/to/helloworld/?page=Home
ID
Each of the components in PRADO has properties like in the HTML component. Attribute name example denoted by ID. In .php, this ID will be a variable that can be accessed with $ this-> ID.
example:
.page : <com:TButton ID=”btn1” />
.php : $this->btn1->Text = “Hello World”;
Components in PRADO
In the latest version of PRADO (PRADO 3.1.3) there are 512 classes / components that can be used, which is not possible if all explained in this
Next following will explain the components that are often used in PRADO. If needed, explanation of the components can be found easily through Google with keyword : T [component name] PRADO, example : TRepeater PRADO.
TForm
Create a form in HTML, used to transmit data to the server. TForm needed if we use a postback. Each page is only allowed to contains a TForm, if it takes more than one, use <form>tag of HTML.
Example:
<com:TForm></com:TForm>
TButton
Create a button that is usually used to submit data. Although with a web-application desktop properly, this function can be shifted so that TButton can be used for the other things.
Two main events are OnClick and OnCommand TButton, where the onClick will not send parameters, but in OnCommand will send a parameter of the command name and parameters that accompany the command (with CommandName and CommandParameter)
Properties that often used by TButton is the Text to display the text contained in these TButton.
Example:
<com:TButton Text=”Hello World”/>
TLabel
One of the components that are not found in HTML. TLabel plain text form, but with a postback, can allow the server to change the Text from TLabel. It could be said TLabel is dynamic text that can be changed by the server.
Example :
<com:TLabel Text=”Announcement from server”/>
TTextBox
Displays an input box that can be filled with data by the user. The main event it held is OnTextChanged which is started when there are any changes of Text on TTextBox.
Example :
<com:TTextBox Text=”input”/>
Validation
It’s different to the usual validation function we created in the Fundamentals of PHP, PRADO provides some kind of validator components, named TRequiredFieldValidator, TCompareValidator, TCustomValidator, TEmailAddressValidator, TChaptchaValidator, and many more with their respective functionality.
The important thing in using these components is the need-filling the property ControlToValidate with an ID of components that we want to validate, usually a TTextBox. Text Property used to fill in error messages.
Example:
<com:TRequiredFieldValidator ControlToValidate=”membername1″ ValidationGroup=”validForm” Text=”<br>enter your name” Display=”Dynamic” />
TMultiView
Using one page for various purposes can be done PRADO with a better way, namely by making a lot of “temporary window” called View which is collected in a MultiView.
This concept means that in one page, we’ll look at one particular page, where at other times in the same page we can see a page that is completely different.
In 1 MultiView require at least 2 View. To show it, we use ActiveViewIndex Property.
Example:
<com:TMultiView ID=”MultiView” ActiveViewIndex=”0″ OnActiveViewChanged=”viewChanged”>
<com:TView>
This is the first View
</com:TView>
<com:TView ID=”view 2”>
This is the second view
</com:TView>
<com:TMultiView>
In .php we just change the ActiveViewIndex property.
$this->MultiView->ActiveViewIndex=1; // mulai dari 0
TRepeater
TRepeater for making components with source of data such as an array, the results of the query, or the other data container.
TRepeater component is the answer if we want to make a lot of components where we do not want loops of the PRADO component just like when we make the loops to the HTML component.
In .php we insert the data with bind() function.
$this->Repeater->DataSource=$mydata;
$this->Repeater->dataBind();
In .page we declare TRepeater as a component.
<table>
<com:TRepeater>
<prop:ItemTemplate>
<tr>
<td><%# $this->DataItem[0]%></td>
<td><%# $this->DataItem[2]%></td>
<td><com:TButton Text = “Reset Password” OnCommand=”Page.resetPass” CommandName=”reset” CommandParameter=<%# $this->DataItem[0]%> /></td>
</tr>
</prop:ItemTemplate>
</com:TRepeater>
</table>
In the example above, we create 1 table that the code inside the ItemTemplate will be looped. <%# … %> used to show the data that already bind to TRepeater. With this method, we can loop as many as bind data.
PRADO Membership
To create a login, PRADO introduce a new way, not by making the session as usual. This method was introduced as a Membership.
In the Membership by PRADO there were several ways, which will be explained one of the easiest ways, i.e. insert users directly (hard-coded ,so that the username and password in the PHP code, not in the database).
This is the modified application.xml
<?xml version=”1.0″ encoding=”utf-8″ ?>
<application Mode=”Performance”>
<paths>
<using namespace=”Application.common.*”/>
</paths>
<services>
<service id=”page” DefaultPage=”Home”>
<modules>
<module class=”System.Security.TAuthManager” UserManager=”users” LoginPage=”UserLogin” />
<module class=”System.Security.TUserManager” PasswordMode=”Clear”>
<user name=”admin” password=”admin!” />
</module>
</modules>
</service>
</services>
</application>
In application.xml code above we use TAuthManager module and add the username and password hard-codedly . Then in login.php we replace it with:
public function btnLoginClick($sender,$param)
{
$m=$this->Application->getModule(‘auth’);
if($m->Login($this->txtUsername->Text,$this->txtPassword->Text))
{
$this->Response->redirect(‘?page=Home’);
}
}
Using Membership is by getModule (‘auth’), and to use it simply by $ m-> Login (), if true then the user has been authenticated.
To log out, simply by using the following code:
$log=$this->Application->getModule(‘auth’);
$log->Logout();
This is one way to use simple authentication module. Another technique is also performed by adding authentication class files in protected folders / common, so that PHP can accept logins from hard-code or the database also.
PRADO Database
Access to the database in PRADO better if made in the form of class even though can be done in PHP fundamentals. Here is the class that inserted in the Access Database protected/common folder .
<?php
class MySqlData extends TModule
{
private $mConn;
private $mDb;
private $host=”localhost”;
private $user=”user”;
private $password=”password”;
private $dbname=”dbname”;
public function Connect()
{
$this->mConn=@mysql_connect($this->host,$this->user,$this->password) ;
$this->mDb=mysql_select_db($this->dbname,$this->mConn);
}
public function ExecuteQuery($param)
{
$result = mysql_query($param,$this->mConn);
return $result;
}
public function Close()
{
if(is_resource($this->mConn))
{ mysql_close($this->mConn); }
}
}
?>
To use it, we have to tell the PRADO that we have new additional module in application.xml with adding these following:
<services>
<service class=”TPageService” DefaultPage=”Login”>
<modules>
<module class=”Application.common.MySqlData” />
</module>
</service>
</services>
The last thing we have to do in order to use it to program is with include that module just like we use authentication model.
$db = $this->Application->getModule(‘data’);
$db->Connect();
$res = $db->ExecuteQuery(” select username from msuser “);
$db->Close();
References
www.pradosoft.com
originally written by Michael MX072.RDT.SLC 2008
Bab 3 Pembahasan Penelitian
3.1. PRADO Meets the eye
PRADO adalah framework yang berbasiskan komponen dan mengenal adanya event sebagai pencetus kerjanya, dimana bekerja pada PHP 5 untuk pemrograman web.
Sebuah komponen dari PRADO adalah kombinasi dari file spesifik (dalam XML), sebuah template HTML (.page), dan dalam sebuah kelas PHP (.php). Komponen-komponen dalam PRADO dikombinasikan bersama untuk membentuk kompenen yang lebih besar ataupun satu halaman PRADO secara utuh.
Adapun keuntungan yang didapatkan dari PRADO untuk para developer Web App:
Semua kode dalam PRADO adalah komponen yang bisa digunakan kembali.
Membuat dan menggunakan komponen dalam PRADO adalah hal yang mudah, biasanya berupa mengubah properties dari komponen tersebut.
Lebih mudah terhindar dari error dan bug karena semua komponen dalam PRADO dituangkan dalam konsep objek, method, dan properties daripada URL POST/GET seperti pada PHP Fundamental.
PRADO menggunakan teknik cache untuk membuat performa yang lebih baik untuk aplikasi yang menggunakannya.
PRADO memungkinkan pembagian tugas dalam team karena bisa membuat dalam bagian-bagian tertentu dalam satu projek yang utuh.
3.2. PRADO Installation
PRADO Framework memiliki homepage di http://www.pradosoft.com dan PRADO terbaru bisa didownload pada http://www.pradosoft.com/download . License pada PRADO berdasarkan BSD License.
Persyaratan PRADO adalah server yang memiliki PHP 5.1.0 atau lebih, dan bisa dijalankan pada Apache HTTP Server 1 maupun 2 dan Windows IIS. Web Browser yang telah dites antara lain : Internet Explorer 5.0, Firefox 1.0, Epiphany 2.14, dan Safari.
Untuk menggunakan PRADO, cukup dengan menyertakan folder framework dari package PRADO yang didownload dari Pradosoft. Folder project yang akan kita buat harus bisa menyertakan link ke file prado.php yang terdapat pada folder framework.
3.3. First Program with PRADO
Contoh program yang akan dibuat adalah dengan menyediakan sebuah Button dengan bertuliskan “Click Me”, dimana ketika user mengklik button tersebut, text pada Button tersebut akan berubah menjadi “Welcome tp PRADOworld”.

Adapun file yang kita butuhkan adalah minimal 3 buah file, yakni index.php, home.page, dan home.php.

Folder helloworld adalah folder yang akan diakses oleh user, sehingga index.php akan menjadi halaman pertama yang akan dilihat oleh user.
Berikut adalah isi dari index.php
<?php
require_once(‘path/to/prado.php’); // include the prado script
$application=new TApplication; // create a PRADO application instance
$application->run(); // run the application
?>
Dalam index.php yang kita butuhkan adalah prado.php yang ada dalam folder framework, karena itu file index.php ini harus menyertakan path menuju folder framework.
Karena PRADO berbasiskan kelas dan objek, maka Application pun adalah object ($application) dari kelas TApplication yang akan di run() untuk menjalankannya.
Berikut adalah isi dari home.page
<html>
<body>
<com:TForm>
<com:TButton Text=”Click me” OnClick=”buttonClicked” />
</com:TForm>
</body>
</html>
home.page merupakan halaman yang akan digunakan sebagai template dari home.php. Dalam prakteknya, semua .page akan berfungsi sebagai file yang menerima HTML saja (walau kenyataannya boleh menyertakan PHP tapi sebisa mungkin dihindari).
Semua komponen PRADO menyertakan <com:T???></com:T???> seperti yang kita lihat pada contoh home.page di atas adalah dengan menyertakan 1 form dimana di dalamnya terdapat 1 button bertuliskan Click me dan ketika diklik akan menjalankan fungsi butttonClicked. Adapun semua komponen PRADO dikerjakan di server, berbeda dengan onclick yang dijalankan di client oleh Javascript.
Berikut adalah isi dari home.php
<?php
class Home extends TPage
{
public function buttonClicked($sender,$param)
{
// $sender refers to the button component
$sender->Text=”Hello World!”;
}
}
?>
Di dalam home.php kita mendeklarasikan nama kelas sesuai dengan nama halamannya, dalam hal ini adalah Home yang diturunkan dari kelas TPage. Semua fungsi dalam PRADO berbasiskan event, dimana bekerja ketika dipanggil dalam .page.
Ketika OnClick pada TButton dijalankan, PRADO menjalankan fungsi buttonClicked dan mengirimkan komponen TButton sebagai $sender dan jika ada, $param menunjukkan parameter tambahan yang dikirimkan.
$sender->Text = “Hello World”;
Pada baris kode di atas, dijelaskan bahwa $sender->Text menunjukkan properties Text milik $sender, dimana dalam hal ini adalah komponen TButton yang dikirimkan. Dengan mengubah properties $sender tersebut, maka Text komponen TButton akan langsung berubah menjadi “Hello World” tanpa mengirimkan POST/GET. Hal ini yang disebut dengan Postback.
Home.page akan menjadi halaman pertama yang dijalankan PRADO. Selebihnya adalah memanggil halaman tersebut dengan http://hostname/path/to/helloworld/index.php. Hostname diganti dengan localhost (jika local) atau host page tersebut (jika tidak local), path/to diganti path menuju folder dimana terdapat folder helloworld di dalamnya.
3.4. Magic Spell in PRADO
Dengan banyaknya istilah-istilah baru dalam PRADO, bagian ini dikhususkan untuk menjelaskan arti / maksud dari istilah-istilah tersebut.
Postback
Dalam PRADO dimungkinkan terdapat Postback dimana halaman itu dikirimkan ke server dan dikembalikan ke client dan proses dari server akan mengubah elemen yang diinginkan.
Dalam hal HelloWorld di atas, dengan AutoPostback, user seakan menekan Button untuk mengubah Text secara langsung selayaknya sebuah program offline / desktop.
Jika programmer tidak membutuhkan AutoPostback dimana tidak diinginkan adanya perubahan ketika user merefresh / bukan postback, perlu adanya (!$this->IsPostback) seperti contoh:
public function onLoad($param)
{
parent::onLoad($param);
if(!$this->IsPostBack)
{
// insert function here
}
}
Dalam contoh di atas, jika tidak terjadi postback, maka function akan dijalankan, jika adalah postback, function tertentu tidak akan dijalankan. Hal ini diperlukan ketika kita butuh membedakan adanya postback atau tidak.
.page + .php
Dalam PRADO sebuah halaman memiliki 2 file, yakni sebuah halaman untuk HTML (.page) dan halaman untuk PHP (.php) dimana keduanya sama-sama membentuk 1 halaman yang utuh. (konsep partial-class)
Page dalam PRADO sendiri dipanggil tidak dengan Home.page ataupun Home.php, tetapi dengan ?page=Home.
Contohnya adalah http://hostname/path/to/helloworld/?page=Home
ID
Setiap dari komponen dalam PRADO memiliki properties seperti layaknya name pada komponen HTML, disimbolkan dengan ID. Dalam .php, ID ini akan menjadi variable yang bisa diakses dengan $this->ID.
Contoh:
.page : <com:TButton ID=”btn1” />
.php : $this->btn1->Text = “Hello World”;
3.5. Components in PRADO
Dalam PRADO terbaru saat ini (PRADO 3.1.3) ada 512 kelas / komponen yang bisa digunakan, dimana tidak mungkin jika semuanya terkover dalam makalah ini.
Berikut akan dijelaskan komponen-komponen yang sering digunakan dalam PRADO. Adapun jika dibutuhkan penjelasan komponen bisa dicari dengan mudah melalui Google dengan searchkey : T[nama komponen] PRADO, contoh : TRepeater PRADO.
TForm
Membuat Form dalam HTML, digunakan untuk mengirimkan data ke server. TForm diperlukan jika kita menggunakan PostBack. Setiap halaman hanya diizinkan memakai satu TForm, jika dibutuhkan lebih dari satu, guinakanlah <form> dari HTML.
Contoh:
<com:TForm></com:TForm>
TButton
Membuat sebuah button yang biasanya digunakan untuk submit data, walau dengan web-application selayaknya desktop, fungsi ini bisa bergeser sehingga TButton bisa digunakan untuk berbagai hal lain.
Dua event utama TButton adalah OnClick dan OnCommand, dimana pada onClick tidak akan mengirim parameter, tapi dalam OnCommand bisa mengirim parameter berupa nama perintah dan parameter perintah yang menyertai (dengan CommandName dan CommandParameter)
Properties yang sering digunakan TButton adalah Text untuk menampilkan tulisan yang tertera pada TButton tersebut.
Contoh:
<com:TButton Text=”Hello World”/>
TLabel
Salah satu dari komponen yang tidak terdapat pada HTML. TLabel berupa text biasa, tapi dengan adanya PostBack, bisa memungkinkan server untuk mengubah Text dari TLabel. Bisa dikatakan TLabel adalah dynamic text dimana bisa diubah oleh server.
Contoh:
<com:TLabel Text=”Announcement from server”/>
TTextBox
Menampilkan sebuah input box yang bisa diisi data oleh para user. Event utama yang dimilikinya adalah OnTextChanged dimana dijalankan ketika adanya perubahan terhadap Text pada TTextBox.
Contoh:
<com:TTextBox Text=”input”/>
Validation
Berbeda dengan fungsi validasi yang biasa kita buat pada PHP Fundamental, PRADO menyediakan beberapa jenis komponen Validator, yakni TRequiredFieldValidator, TCompareValidator, TCustomValidator, TEmailAddressValidator, TChaptchaValidator, dan masih banyak lagi dengan fungsinya masing-masing.
Yang perlu diperhatikan dalam menggunakan komponen ini adalah perlunya properties ControlToValidate yang diisikan ID dari komponen yang kita validasi, biasanya berupa TTextBox. Properties Text biasa digunakan untuk mengisi pesan kesalahan.
Contoh:
<com:TRequiredFieldValidator ControlToValidate=”membername1″ ValidationGroup=”validForm” Text=”<br>enter your name” Display=”Dynamic” />
TMultiView
Menggunakan satu halaman saja untuk berbagai keperluan bisa dilakukan PRADO dengan cara yang lebih baik, yaitu dengan membuat banyak “window sementara” disebut View yang dikumpulkan dalam satu MultiView.
Konsep ini berarti dalam satu halaman, kita akan melihat satu halaman tertentu, dimana pada saat lain dalam halaman yang sama kita bisa melihat halaman yang benar-benar berbeda.
Dalam 1 MultiView membutuhkan setidaknya 2 View dimana untuk memperlihatkannya bisa dengan Properties ActiveViewIndex.
Contoh:
<com:TMultiView ID=”MultiView” ActiveViewIndex=”0″ OnActiveViewChanged=”viewChanged”>
<com:TView ID=”view 1″>
Ini adalah view pertama
</com:TView>
<com:TView ID=”view 2”>
Ini adalah view kedua
</com:TView>
<com:TMultiView>
Pada .php jika ingin diubah hanya dengan mengubah propertiesnya saja.
$this->MultiView->ActiveViewIndex=1; // mulai dari 0
TRepeater
Untuk membuat komponen-komponen sebanyak tertentu yang sumber datanya bisa berupa array, hasil dari query, maupun penampung data lainnya.
Komponen TRepeater adalah jawaban jika kita mau membuat banyak komponen dimana tidak bisa kita melakukan looping terhadap komponen PRADO seperti kita membuat looping terhadap komponen HTML.
Dalam .php kita memasukkan data dengan bind()
$this->Repeater->DataSource=$mydata;
$this->Repeater->dataBind();
Sedang dalam .page kita mendeklarasikan TRepeater sebagai komponen.
<table>
<com:TRepeater ID=”Repeater”>
<prop:ItemTemplate>
<tr>
<td><%# $this->DataItem[0]%></td>
<td><%# $this->DataItem[2]%></td>
<td><com:TButton Text = “Reset Password” OnCommand=”Page.resetPass” CommandName=”reset” CommandParameter=<%# $this->DataItem[0]%> /></td>
</tr>
</prop:ItemTemplate>
</com:TRepeater>
</table>
Dalam contoh di atas dibuat 1 table dimana diulang kode yang ada di bagian ItemTemplate. <%# … %> digunakan untuk menampilkan data yang dibind() pada TRepeater. Dengan cara ini, kita bisa meloop sebanyak data yg dibind().
3.6. PRADO Membership
Dalam hal membuat login, PRADO memperkenalkan cara baru, tidak dengan membuat Session seperti biasanya. Cara ini diperkenalkan sebagai Membership.
Dalam Membership oleh PRADO pun ada beberapa cara, yang akan dijelaskan satu cara yang paling mudah, yaitu memasukkan user langsung secara hard-code (sehingga username dan password ada di kode PHP tidak di database).
Berikut adalah application.xml yang diubah
<?xml version=”1.0″ encoding=”utf-8″ ?>
<application id=”Admin” Mode=”Performance”>
<paths>
<using namespace=”Application.common.*”/>
</paths>
<services>
<service id=”page” class=”TPageService” DefaultPage=”Home”>
<modules>
<module id=”auth” class=”System.Security.TAuthManager” UserManager=”users” LoginPage=”UserLogin” />
<module id=”users” class=”System.Security.TUserManager” PasswordMode=”Clear”>
<user name=”admin” password=”admin!” />
</module>
</modules>
</service>
</services>
</application>
Pada kode application.xml di atas kita menggunakan module TAuthManager dan menambahkan username serta password langsung secara hard-code. Dengan cara ini, maka pada login.php kita menggantinya dengan:
public function btnLoginClick($sender,$param)
{
$m=$this->Application->getModule(‘auth’);
if($m->Login($this->txtUsername->Text,$this->txtPassword->Text))
{
$this->Response->redirect(‘?page=Home’);
}
}
Pemakaian Membership adalah dengan getModule(‘auth’), dan untuk menggunakannya cukup dengan $m->Login(), jika benar maka user telah terautentikasi.
Untuk logout, cukup dengan menggunakan kode berikut:
$log=$this->Application->getModule(‘auth’);
$log->Logout();
Ini adalah salah satu cara pemakaian module authentikasi sederhana. Teknik lain ada juga dilakukan dengan menambah file kelas autentikasi di folder protected/common, sehingga PHP bisa menerima login dari hard-code sekaligus dari database.
3.7. PRADO Database
Akses ke database dalam PRADO diusahakan dibuat dalam bentuk kelas walau secara teknis bisa dilakukan secara PHP fundamental. Berikut adalah kelas Database Access yang dimasukkan dalam folder protected/common.
<?php
class MySqlData extends TModule
{
private $mConn;
private $mDb;
private $host=”localhost”;
private $user=”user”;
private $password=”password”;
private $dbname=”dbname”;
public function Connect()
{
$this->mConn=@mysql_connect($this->host,$this->user,$this->password) ;
$this->mDb=mysql_select_db($this->dbname,$this->mConn);
}
public function ExecuteQuery($param)
{
$result = mysql_query($param,$this->mConn);
return $result;
}
public function Close()
{
if(is_resource($this->mConn))
{ mysql_close($this->mConn); }
}
}
?>
Untuk menggunakannya kita wajib memperkenalkan dahulu ke PRADO melalui application.xml dengan menambahkan berikut:
<services>
<service id=”page” class=”TPageService” DefaultPage=”Login”>
<modules>
<module id=”data” class=”Application.common.MySqlData” />
</module>
</service>
</services>
Hal terakhir untuk dapat menggunakannya dalam program adalah dengan memasukkan module tersebut seperti menggunakan moduel authentication.
$db = $this->Application->getModule(‘data’);
$db->Connect();
$res = $db->ExecuteQuery(” select username from msuser “);
$db->Close();
Daftar Pustaka
www.pradosoft.com
FLTK – Flash Light Tool Kit
Introduction
GUI Widget vs. Toolkit
In computer programming, a widget (or control) is an element from GUI (Graphical Unit Interface) that shows information (data) and can be changed, modified, or added by user. Example window to showing data and text box to input or modifying data.
Characteristic to define the widget is to provide interaction from the user to the data, the widget is a simple form which, if implemented in an application program holds all the data processed by the application and felt the interaction with the data.
On the other hand, the Toolkit is a library that holds the widget that is usually developed in classes and can be run in a particular language by connecting the libraries of the toolkit with the language, eg C + +.
FLTK History
The Flash Light Tool Kit (“FLTK”, read as “fulltick”) is cross-platform GUI Toolkit from C++ language that can be run on UNIX/LINUX, Windows, and MacOS X. FLTK allows modern GUI function that support 3D graphic with OpenGL. FLTK was developed first by Bill Spitzak and still being developed by developers from all around the world.
FLTK widgets encompasses all that is usually used to create programs that will be developed. In addition, FLTK can also receive new widgets that can be made easily through the C++ class .
Fl_Button is possible to perform a usual keystrokes, check box , radio button, even those that support a toggle function. All those possibilities can be operated directly in a single widget only by its own mode .
To capture an input from user, Fl_input allows us to make a textbox that receive data from user with many various needed modes and settings to be wanted widget. Besides text box, Fl_valuator possible to receive input in the form of number. Fl_Valuator can be formed a scroll bar or slider.
Fl_Menu allows to give menu function like menu bar and combo box. Fl_Browser give widget that support list control too, and there many other widget which we can use.
Beside for making UI (User Interface), FLTK also give easiness to give an alert message box, yes/no/cancel option message box, file chooser, help, and prompt window that ask user for text and password.
For the better UI appearance, FLTK 1.1.x offer 2 kind of UI, “standard” and “plastic”. FLTK 2.0 allow users to choose what is the better UI appearance that their wanted according to the setting.
FLTK installation
FLTK toolkit can be downloaded in it’s official home page in http://www.fltk.org. There are 2 versions of FLTK. The one that still being developed but stable is 1.3.x version. The one that still being developed is version 2. So, for stability, I will explain FLTK 1.3.x-r6530 version.
FLTK Basic
To use FLTK, we have to put <FL/Fl.H> in the beginning of the program. Beside that, we have to put other header files depend on what widget we will use.
Example:
#include <FL/Fl.H>
#include <FL/Fl_Window.H>
#include <FL/Fl_Box.H>
int main(int argc, char **argv) {
Fl_Window *window = new Fl_Window(300,180);
Fl_Box *box = new Fl_Box(20,40,260,100,”Hello, World!”);
box->box(FL_UP_BOX);
box->labelsize(36);
box->labelfont(FL_BOLD+FL_ITALIC);
box->labeltype(FL_SHADOW_LABEL);
window->end();
window->show(argc, argv);
return Fl::run();
}
This is the description of the code above :
Fl_Window *window = new Fl_Window(300,180);
First, we create a window with size 300 x 180.
Fl_Box *box = new Fl_Box(20,40,260,100,”Hello, World!”);
Then we create a box with text “Hello Word” in the middle of it. As the default, FLTK will insert it in a group of active widget.
box->box(FL_UP_BOX);
box->labelsize(36);
box->labelfont(FL_BOLD+FL_ITALIC);
box->labeltype(FL_SHADOW_LABEL);
In that part of code, we modify the properties of that box.
window->end();
The code above is to give statement that we’ve done with the window.
window->show(argc, argv);
return Fl::run();
And we show the window and insert it the main loop of FLTK.
You can see the output of the program like this:

The program will end whether you click close or press ESC button.
Using Widget
A widget created by using new operator in C++. The parameter that usually used in the constructor is :
Fl_Widget(x, y, width, height, label)
X and y parameter determine where the widget or the window will appear on the screen. In FLTK, the coordinates (0,0) pixel is on the left top the screen. The next parameter are width and height the widget in pixels.
Making widget hierarchy
Usually, widgets are combined to a single group and can be grouped again, to form a hierarchy from all widget. FLTK allow to fill this group with put a widget by putting it between myGroup->begin() and myGroup->end(). In this example, myGroup will be an active group.
Get/Set Function
We can change the type of Fl_Box, example, box->box(FL_UP_BOX). So, we change the box from it’s default FL_NO_BOX (box without image). In the “Hello World” example above, we use FL_UP_BOX that make the border of the box looks like bevels.
To get the current type of the box, we can use box->box(). FLTK use function name that overload the get/set function. “set” usually like “void name(type)”, and “get” usually like “type name() const”.
Redraw
After changing the type with “set”, we need to redraw the widget. Why? because the widget not immediately updated. So, after made any changes, we have to call redraw() function.
Label
Every single widget can use a label. Inside of widget window, label used to make a title bar. In the example program above, we change property of label such as font, size, and it’s type.
Labelfont function changes the font that used and also it’s typefaces, with FL_BOLD and FL_ITALIC. Labelsize function is to set the height of the font in pixels. Labeltype function to determine the type of label.
Main Event Loop
Every FLTK application and GUI application generally based on event-processing. so if the user moves the mouse, press a button, and using the keyboard, it will call an event that can be captured by the application.
FLTK also supports specific event like idle, timer, and file pseudo-events that will be run if met requirement. Idle called when user don’t act or input anything. Timer called after specified count of time has been passed, can be used to show time or a running process. File called when we need read and write file process.
FLTK application need periodic checks (Fl::check()) or wait function (Fl::wait()) to respond an event and Fl::run() to run a loop. Fl::run() equals while. Fl::run() do not return any value until all FLTK control has been closed by user or program.
Common Widget
Buttons

Fl_Button – Button standard
Fl_Check_Button – Button with Checkbox
Fl_Light_Button – Button with toggle function
Fl_Repeat_Button – Button with repeat function
Fl_Return_Button – Button with functioning when ENTER button pressed.
Fl_Round_Button – Button with Radio
All Button need appropriate header file (example Fl_light_Button). After adding the header, we can create button with appropriate constructor.
Example: Fl_Button *button = new Fl_Button(x, y, width, height, “label”);
For Light Button and Round, method value() returns it’s status ( 0 = off, 1 = on). Set() and clear() to set the status. Setonly() function needed by Round in order to just 1 that can be chosen.
Text
Fl_Input – Text Input 1 line
Fl_Output – Text Output 1 line
Fl_Multiline_Input – Text Input multi line
Fl_Multiline_Output – Text Output multi line
Fl_Text_Display – Text Display multi line
Fl_Text_Editor – Text Editor multi line
Fl_Help_View – HTML Help
Method value() used to get/set string from Text In/Output.
Example:
Fl_Input *input = new Fl_Input(x, y, width, height, “label”);
input->value(“Now is the time for all good men…”);
Valuators

Method value() used to get/set value from each widget. Minimum() and maximum() used to set top and bottom value limit.
Colors
To set colors, we can use the constants or by RGB value. The constants from FLTK are FL_BLACK, FL_RED, FL_GREEN, FL_YELLOW, FL_BLUE, FL_MAGENTA, FL_CYAN, FL_WHITE
To set color from RGB values combination we use:
Fl_Color c = fl_rgb_color(85, 170, 255);
To set color to a widget, we use the color() method and for a label we use labelcolor().
Example : button->color(FL_RED);
button->labelcolor(FL_WHITE);
Callbacks
After understanding how to show the widget on the screen, now we will learn how to create an event that will happen when a widget receive a specified input. That’s called callback, a function that called when a value of widget has been changed.
void xyz_callback(Fl_Widget *w, void *data) {
…
}
To connect the widget and the callback :
int xyz_data;
button->callback(xyz_callback, &xyz_data);
Shortcuts
To accelerate, FLTK allows to make widget shortcut, that will be activated after certain button pressed.
Example:
button->shortcut(FL_Enter);
button->shortcut(FL_SHIFT + ‘b’);
button->shortcut(FL_CTRL + ‘b’);
button->shortcut(FL_ALT + ‘b’);
button->shortcut(FL_CTRL + FL_ALT + ‘b’);
button->shortcut(0); // no shortcut
FLTK Class Reference
| Fl | The Fl is the FLTK global (static) containing state information and global methods for the current application |
| Fl_Adjuster | Was stolen from Prisms, and has proven to be very useful for values that need a large dynamic range |
| Fl_Bitmap | Supports caching and drawing of mono-color (bitmap) images |
| Fl_BMP_Image | Supports loading, caching, and drawing of Windows Bitmap (BMP) image files |
| Fl_Box | This widget simply draws its box, and possibly it’s label |
| Fl_Browser | Displays a scrolling list of text lines, and manages all the storage for the text |
| Fl_Browser_ | This is the base class for browsers |
| Fl_Button | Buttons generate callbacks when they are clicked by the user |
| Fl_Cairo_State | Contains all the necessary info on the current cairo context |
| Fl_Cairo_Window | This defines a pre-configured cairo fltk window |
| Fl_Chart | Fl_Chart displays simple charts |
| FL_CHART_ENTRY | For internal use only |
| Fl_Check_Browser | Displays a scrolling list of text lines that may be selected and/or checked by the user |
| Fl_Check_Button | A button with an “checkmark” to show its status |
| Fl_Choice | A button that is used to pop up a menu |
| Fl_Clock | This widget provides a round analog clock display |
| Fl_Clock_Output | This widget can be used to display a program-supplied time |
| Fl_Color_Chooser | Standard RGB color chooser |
| Fl_Counter | Controls a single floating point value with button (or keyboard) arrows |
| Fl_Device | All graphical output devices and all graphics systems |
| Fl_Device_Plugin | This plugin socket allows the integration of new device drivers for special window or screen types |
| Fl_Dial | Circular dial to control a single floating point value |
| Fl_Display_Device | A display to which the computer can draw |
| Fl_Double_Window | The Fl_Double_Window provides a double-buffered window |
| Fl_End | This is a dummy class that allows you to end a Fl_Group in a constructor list of a class: |
| Fl_File_Browser | Displays a list of filenames, optionally with file-specific icons |
| Fl_File_Chooser | Displays a standard file selection dialog that supports various selection modes |
| Fl_File_Icon | Manages icon images that can be used as labels in other widgets and as icons in the FileBrowser widget |
| Fl_File_Input | This widget displays a pathname in a text input field |
| Fl_Fill_Dial | Draws a dial with a filled arc |
| Fl_Fill_Slider | Widget that draws a filled horizontal slider, useful as a progress or value meter |
| Fl_Float_Input | Subclass of Fl_Input that only allows the user to type floating point numbers (sign, digits, decimal point, more digits, ‘E’ or ‘e’, sign, digits) |
| Fl_Font_Descriptor | This a structure for an actual system font, with junk to help choose it and info on character sizes |
| Fl_FormsBitmap | Forms compatibility Bitmap Image Widget |
| Fl_FormsPixmap | Forms pixmap drawing routines |
| Fl_Free | Emulation of the Forms “free” widget |
| Fl_GDI_Graphics_Driver | The MSWindows-specific graphics class |
| Fl_GIF_Image | Supports loading, caching, and drawing of Compuserve GIFSM images |
| Fl_Gl_Window | Sets things up so OpenGL works |
| Fl_Glut_Bitmap_Font | Fltk glut font/size attributes used in the glutXXX functions |
| Fl_Glut_Window | GLUT is emulated using this window class and these static variables (plus several more static variables hidden in glut_compatability.cxx): |
| Fl_Graphics_Driver | A virtual class subclassed for each graphics driver FLTK uses |
| Fl_Group | FLTK container widget |
| Fl_Help_Dialog | Displays a standard help dialog window using the Fl_Help_View widget |
| Fl_Help_Font_Style | Fl_Help_View font stack element definition |
| Fl_Help_Link | Definition of a link for the html viewer |
| Fl_Help_Target | Fl_Help_Target structure |
| Fl_Help_View | Displays HTML text |
| Fl_Hold_Browser | The Fl_Hold_Browser is a subclass of Fl_Browser which lets the user select a single item, or no items by clicking on the empty space |
| Fl_Image | Fl_Image is the base class used for caching and drawing all kinds of images in FLTK |
| Fl_Input | This is the FLTK text input widget |
| Fl_Input_ | This class provides a low-overhead text input field |
| Fl_Input_Choice | A combination of the input widget and a menu button |
| Fl_Int_Input | Subclass of Fl_Input that only allows the user to type decimal digits (or hex numbers of the form 0xaef) |
| Fl_JPEG_Image | Supports loading, caching, and drawing of Joint Photographic Experts Group (JPEG) File Interchange Format (JFIF) images |
| Fl_Label | This struct stores all information for a text or mixed graphics label |
| Fl_Light_Button | |
| Fl_Menu_ | Base class of all widgets that have a menu in FLTK |
| Fl_Menu_Bar | This widget provides a standard menubar interface |
| Fl_Menu_Button | This is a button that when pushed pops up a menu (or hierarchy of menus) defined by an array of Fl_Menu_Item objects |
| Fl_Menu_Item | The Fl_Menu_Item structure defines a single menu item that is used by the Fl_Menu_ class |
| Fl_Menu_Window | Window type used for menus |
| Fl_Multi_Browser | Subclass of Fl_Browser which lets the user select any set of the lines |
| Fl_Multiline_Input | This input field displays ‘ ‘ characters as new lines rather than ^J, and accepts the Return, Tab, and up and down arrow keys |
| Fl_Multiline_Output | This widget is a subclass of Fl_Output that displays multiple lines of text |
| Fl_Native_File_Chooser | This class lets an FLTK application easily and consistently access the operating system’s native file chooser |
| Fl_Output | This widget displays a piece of text |
| Fl_Overlay_Window | This window provides double buffering and also the ability to draw the “overlay” which is another picture placed on top of the main image |
| Fl_Pack | This widget was designed to add the functionality of compressing and aligning widgets |
| Fl_Paged_Device | Represents page-structured drawing surfaces |
| Fl_Pixmap | Supports caching and drawing of colormap (pixmap) images, including transparency |
| Fl_Plugin | Fl_Plugin allows link-time and run-time integration of binary modules |
| Fl_Plugin_Manager | Fl_Plugin_Manager manages link-time and run-time plugin binaries |
| Fl_PNG_Image | Supports loading, caching, and drawing of Portable Network Graphics (PNG) image files |
| Fl_PNM_Image | Supports loading, caching, and drawing of Portable Anymap (PNM, PBM, PGM, PPM) image files |
| Fl_Positioner | This class is provided for Forms compatibility |
| Fl_PostScript_File_Device | To send graphical output to a PostScript file |
| Fl_PostScript_Graphics_Driver | PostScript graphical backend |
| Fl_PostScript_Printer | Print support under Unix/Linux |
| Fl_Preferences | Fl_Preferences provides methods to store user settings between application starts |
| Fl_Preferences::Name | ‘Name’ provides a simple method to create numerical or more complex procedural names for entries and groups on the fly |
| Fl_Printer | OS-independent print support |
| Fl_Progress | Displays a progress bar for the user |
| Fl_Quartz_Graphics_Driver | The Mac OS X-specific graphics class |
| Fl_Repeat_Button | The Fl_Repeat_Button is a subclass of Fl_Button that generates a callback when it is pressed and then repeatedly generates callbacks as long as it is held down |
| Fl_Return_Button | The Fl_Return_Button is a subclass of Fl_Button that generates a callback when it is pressed or when the user presses the Enter key |
| Fl_RGB_Image | Supports caching and drawing of full-color images with 1 to 4 channels of color information |
| Fl_Roller | “dolly” control commonly used to move 3D objects |
| Fl_Round_Button | Buttons generate callbacks when they are clicked by the user |
| Fl_Round_Clock | A clock widget of type FL_ROUND_CLOCK |
| Fl_Scroll | This container widget lets you maneuver around a set of widgets much larger than your window |
| Fl_Scrollbar | Displays a slider with arrow buttons at the ends of the scrollbar |
| Fl_Secret_Input | Subclass of Fl_Input that displays its input as a string of asterisks |
| Fl_Select_Browser | The class is a subclass of Fl_Browser which lets the user select a single item, or no items by clicking on the empty space |
| Fl_Shared_Image | This class supports caching, loading, and drawing of image files |
| Fl_Simple_Counter | This widget creates a counter with only 2 arrow buttons |
| Fl_Single_Window | This is the same as Fl_Window |
| Fl_Slider | Sliding knob inside a box |
| Fl_Spinner | This widget is a combination of the input widget and repeat buttons |
| Fl_Surface_Device | A surface that’s susceptible to receive graphical output |
| Fl_Sys_Menu_Bar | A class to create, modify and delete menus that appear on Mac OS X in the menu bar at the top of the screen |
| Fl_System_Printer | Print support under MSWindows and Mac OS X |
| Fl_Table | A table of widgets or other content |
| Fl_Table_Row | A table with row selection capabilities |
| Fl_Tabs | “file card tabs” interface that allows you to put lots and lots of buttons and switches in a panel, as popularized by many toolkits |
| Fl_Text_Buffer | This class manages unicode displayed in one or more Fl_Text_Display widgets |
| Fl_Text_Display | This is the FLTK text display widget |
| Fl_Text_Display::Style_Table_Entry | This structure associates the color,font,size of a string to draw with an attribute mask matching attr |
| Fl_Text_Editor | This is the FLTK text editor widget |
| Fl_Text_Editor::Key_Binding | Simple linked list associating a key/state to a function |
| Fl_Text_Selection | This is an internal class for Fl_Text_Buffer to manage text selections |
| Fl_Tile | Lets you resize the children by dragging the border between them: |
| Fl_Tiled_Image | This class supports tiling of images over a specified area |
| Fl_Timer | This is provided only to emulate the Forms Timer widget |
| Fl_Toggle_Button | The toggle button is a push button that needs to be clicked once to toggle on, and one more time to toggle off |
| Fl_Tooltip | Tooltip support for all FLTK widgets |
| Fl_Tree | Tree widget |
| Fl_Tree_Item | Tree item |
| Fl_Tree_Item_Array | Manages an array of Fl_Tree_Item pointers |
| Fl_Tree_Prefs | Tree widget’s preferences |
| Fl_Valuator | Controls a single floating-point value and provides a consistent interface to set the value, range, and step, and insures that callbacks are done the same for every object |
| Fl_Value_Input | Displays a numeric value |
| Fl_Value_Output | Displays a floating point value |
| Fl_Value_Slider | Fl_Slider widget with a box displaying the current value |
| Fl_Widget | Fl_Widget is the base class for all widgets in FLTK |
| Fl_Widget_Tracker | This class should be used to control safe widget deletion |
| Fl_Window | This widget produces an actual window |
| Fl_Wizard | This widget is based off the Fl_Tabs widget, but instead of displaying tabs it only changes “tabs” under program control |
| Fl_XBM_Image | Supports loading, caching, and drawing of X Bitmap (XBM) bitmap files |
| Fl_Xlib_Graphics_Driver | The Xlib-specific graphics class |
| Fl_XPM_Image | Supports loading, caching, and drawing of X Pixmap (XPM) images, including transparency |
References
FLTK homepage http://www.fltk.org
Originally written by Michael MX072.RDT.SLC
Intorduction
The model was created so that we can try to implement a system to a series of processes in a reality. With this model, we do not have to waste too much money to find out the results of a system before we implement it.
Ventana Simulation is one of the simulators that are used to form the model, so that we can get the results before we implement it in the real world.
Through this post, the authors introduce the theoretical model and how to establish the model in the Ventana Simulation.
Theories
Modelling and Simulation
1. Reality and System
Everything must follow a certain rules, like water flowing from high places to lower places. So it is with reality, there is a law that can explain everything that happens. The theory that can describe the behavior of a state, event, or event being considered is the purpose of science.
The system is part of the real world that consists of certain elements, in which the components and processes interact with each other is designed based on the concept developed in accordance with desired goals.
A system is a collection of components or elements that are considered as a constituent of the real world are considered, and these elements are related to each other and grouped for the purpose of the study of reality. (S. M. Sitompul, 2002, P45). Selections are made to the constituent elements of the system under study purposes, therefore the system is only a representative of the actual form of a simple fact.
The model can be limited as a concept (which is already mature or still in development) of a simplified system. Therefore, the model can be considered to be a substitute or replacement for the system being considered and used if it is easier to work with the replacement of the real system. In fact, almost activities use of the model.
Simulation is an imitation of something real, the situation around (state of affairs), or the process. Action simulating something generally represents a key characteristic or behaviour of physical or abstract systems.
2. Modelling Process
A model is a representation of the system in real life that be the focus of attention and the main issue. Modeling can be defined as the process of model building from system by using a specific formal language. (Erma, 2006, p2).

From the picture above can be seen that the modeling process starts from a problem in the real system is viewed by the modeler with the angle of view depends on the knowledge model maker, to create a model. This model will be tested for validity using sample data to produce a valid model.
3. Benefits of Simulation
Model simulation is a flexible tool in solving difficult problems solved in a mathematical model. The use of simulation will provide a broader insight to the management in solving problems.
Therefore, the primary benefit of simulation model is a tool for decision makers, in this case the manager to create a system with a particular way of working within the system design phase and operational phase.
Advantage of Simulation Model:
– We can experiment without risk to real systems. Simulation allows to conduct experiments on the system without having to bear the risk of running system.
– Simulation can predict system performance in certain circumstances and provide the best alternative according to desired specifications.
– Simulation allows for long-term study in a relatively short time.
4. Basic Structure of Simulation Model
Although the model is made very complex, essentially the basic structure is very simple and can be expressed mathematically as follows:
 ……………………………………………………………………………………. (1)
Where :
E = sistem performance effect
Xi = controllable variabel and parameter
Yj = uncontrollable variabel and parameter
f = relationship between Xi dan Yj that produce E
Each model will generally have the following elements:
1. The components of the model, i.e. entities that make up the model, is defined as an object of concern to the main system.
2. Variables, namely the value that is always changing.
3. Parameters, i.e. a fixed value at some time, but may change at different times.
4. Functional relationships, i.e. n relationship between the components of the model.
5. Constraints, i.e. constraints of the faced problems.
5. Simulation Steps
In the simulation there are steps that need to be done:
1. Defining the system, determine the limits of the system and the identification of significant variables.
2. Model Formulation, which formulates the relationship between the component models.
3. Data retrieval, data identification that fit the model.
4. Verification Model, namely the process of checking whether the model is free from error. Model need to be adjusted with the used simulation language In this stage.
5. Model Validation
The process of testing whether the model is in conformity with the real system. In the Yemen Barlas’s journal (“Multiple Tests for Validation of System Dynamics Type of Simulation Models”) there are two ways :
a. Mean comparison
Where :
= nilai rata-rata hasil simulasi
![]() = nilai rata-rata data aktual
= nilai rata-rata data aktual
b. Amplitudo Variation Comparison
Model considered as valid if E2 ≤ 30%.
6.Scenario
A Preparation of scenarios to a model. Once the model is considered valid, then the next is to create multiple scenarios or experiments to improve the performance of the system in accordance.
7.Model Interpretation
Drawing conclusions from the results of process simulation model output.
8. Implementation
9. Documentation
Case Study
Modelling Simulation example
Time and Transjakarta Bus passenger queue data, November 2008.
Explaination
(in)(out)
The arrows on the model suggest a link between one variable and other variables. Output variables are located on the marked arrows, while the opposite is the input.
example:
The variable pointed by the other variables will be the dependent variable. When the simulation starts, this variable’s value can’t be changed directly. Meanwhile, the variables pointed to other variables will be independent variables, which it’s value can be changed via the provided scrollbar, and modify other related dependent variables.
Causes Tree shows the relationship of variable that refers to specific variables. Uses Tree shows the relationship of variables will point to other variables.
Figure Causes Tree and Uses Tree
When running the simulation by pressing one button above, Vensim will simulate a model that has been prepared. In the simulation state variables can be changed in value and show the changes in other related variables.
The calculation of the model can be set by pressing the “EQUATIONS” button and select the desired variable is. Example calculation of the variable Harmony is as follows:
Harmoni = Sawah Besar + kemacetan 5 + 130+ penumpang 5 / 7
Description:
– Harmoni is estimated time when arrive at Harmoni Shelter
– Sawah Besar is estimated time when arrive at Sawah Besar Shelter
– Kemacetan 5 is the time when traffic jam between Harmoni and Sawah Besar
– 130 is the travel time without calculating the traffic jam
– Penumpang 5 is the number of queues in the Harmoni Shelter
– 7 is dividing factor, the smaller the number, the more often the passenger in/out the bus.
originally written by Michael 072 RDT.SLC 2009
Steps making windows application that use WiiMote part two
Sorry to leave you wandering those codes I wrote before. I’ll explain it here right now.
If you didn’t read my previous post (Steps make windows application that use WiiMote part two) click here to read.
Here the explaination. First, about the timer1_tick method. That method always loop every 10 ms while your application running. How did I know it loops every 10 ms? You can see properties of Timer at properties box. The interval has been set 10 ms. Why 10 ms? There is no particular reason though. Just set the interval not too fast or too slow.
Now we validating the wiimote whether it is null (no wiimote detected) or not null.
if(wiimote!= null){
……
}
Before we can read the information from wiimote, we have to get the state of the wiimote.
wiimoteState= wiimote.WiimoteState;
If you want to see what are the attributes that wiimotestate has just type wiimote and then dot ( . ). The IDE will show you.Now you can get all information from your wiimote. This is the list of a fewwiimotestate attribute.
Battery :
The current value of the batteries. The number is
between 0 – 100 floating points;
ButtonState:
Get the current pressed button on wiimote. Return true if the specified button pressed, the otherwise return false. Example you want to know whether button A is pressed or not;
if(wiimoteState.ButtonState.A){ … }
each button is in the ButtonState class and each return true if the button is pressed (except power and sync button).
AccelState:
Get the accelerometer values. There are 3 values; x, y, and z.
wiimoteState.AccelState.Values
The data type is Point3F.
IRState:
Get all detected IR points. You can get how many points detected, their coordinates, or boolean value detected or not detected.
wiimoteState.IRState.IRSensors
is an array of the detected IR. You can get how
many IR detected by get the length of that array.
wiimoteState.IRState.IRSensors.Length
To know if an IR detected or not:
wiimoteState.IRState.IRSensors[0].Found
The data type is boolean.
it’s coordinate :
wiimoteState.IRState.IRSensors[0].Position
The data type is PointF, that have two values, X and Y.
LEDState:
Get condition of all LED on WiiMote. Return true if the specified LED is on.
Example LED 1, wiimoteState.LEDState.LED1
Extension:
Get condition whether an extension is connected or not.
Rumble:
Get condition whether the wiimote is vibrating or not.
There are more wiimotestates attribute, such as DrumsState, GuitarState, NunchuckState, etc. All of them are states from extension devices like guitar, drum, balance board, nunchuck, classiccontroller, etc.
We have seen the wiimotestate attributes. Those attributes are read-only data. We can’t modify the value, but we can use it for calculation or something else. WiimoteState is only to get information from the wiimote. So, how to give some command to it? I will explain that. But we can only do a few things. Not much.
To see anything that we can do to wiimote, let’s see the attribute and method in it.
wiimote.Connect();
wiimote.Disconnect();
the method above is just to connect and disconnect the wiimote to the program.
wiimote.SetLEDs(intled);
wiimote.SetLEDs(bool led1, bool led2, bool led3, bool led4);
those method are to set what led that we want to turn on. The first method if you want to set which LED number that should be on. Second, if you want to set all of conditions of LED (1 to 4). Example, if you
want to turn the LED on like “ ON OFF ON ON”, you can simply pass the parameters like this:
wiimote.SetLEDs(true,false,true,false);
wiimote.SetRumble(bool on);
As you can see the name of the method, it is for turn the rumble on or off. Just simply pass true or false.
Now you should be understand what the meaning of my codes below :
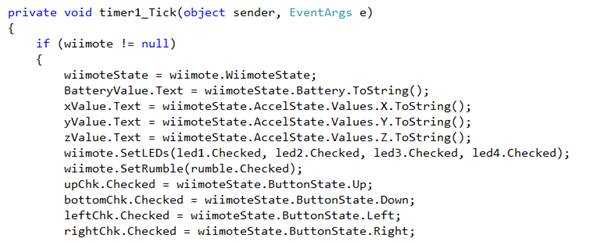

I will explain some variable from component of my application form.
xProg , yProg, zProg, batteryLevel are progress bar component. They represent the value of wiimotestate attribute. You can see what kind of attribute their represent from my code above.
upChk, bottomChk, leftChk, rightChk are check boxes that
will be checked if we press directional button on wiimote.
rumble is a check box too, if it be checked, the wiimote will vibrating.
led1 to led4 are check boxes too, the LEDs on wiimote will be turned on or off depending on them.
thanks for your attention…..